
Checkout
The purpose of a checkout page is to convert a customer's cart to an order.
In order to provide the best possible user experience, the process should be as straight forward as possible. Customer's should have some indication of how many steps are required to complete the checkout.
Additionally there should be no requirement to leave the checkout page to complete almost any reasonable change or update a user might want to make to their cart or account during the checkout process. Minimizing interruptions and user experience challenges will also help to minimize checkout abandonment.
Functional Overview of Checkout Process
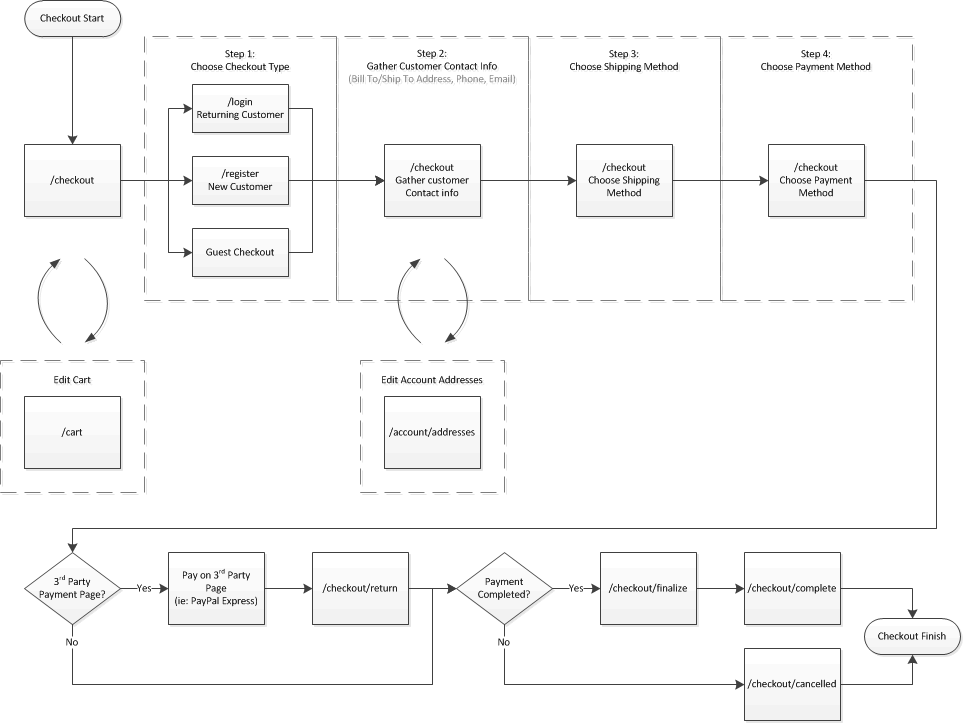
Checkout Start
When a visitor lands on the checkout page, StoreBuilder will check what the state of their cart is.
If the visitors cart is empty (no items) then display some kind of friendly cart empty message (and maybe show a list of recently viewed products).
The visitors cart has items in it, then we can check if Step 1 has already been fulfilled. If Step 1 was already previously completed (and the visitor simply left the page to modify their cart or check something) we can safely skip to the next step. We can continue evaluating if each step has been completed and advance to the next step if previously completed, all the way to final payment.
Visitors should be free to leave and return to the checkout page without be "punished" by having to redo steps they already completed.
Step 1: Choose Checkout Type
There are fundamentally 3 types of visitor checkouts: returning customers, new customers and guest checkouts.
Returning Customers already have an account on your website most likely from a previous order. By logging in, they will have quick access to any saved addresses in their address book and/or saved payment methods.
New Customers do not already have an account on your website, but would like to sign up for one.
Guest Checkouts are customers who just want to make a purchase without having to create an account. Note: It should be possible to convert a guest checkout customer to an account at a later time as sometimes customers are just "checking out" the business and if happy with the service may consider doing more business with you again in the future.
Step 2: Gather Customer Contact Info
This step is intended to gather the billing/shipping information required to calculate taxes, estimate shipping costs, and ultimately fulfill the order. Most commonly this will be an address, phone number and email.
Step 3: Choose Shipping Method
This step will present the customer with a list of available shipping options for selection (calculated by any Shipping Provider Plugins you have installed in your StoreBuilder project).
Step 4: Choose Payment Method
This step will present the customer with a list of available payment options for completing their order.
Checkout Implementation Details
The checkout page by default will be routed to the /checkout url. The checkout page will be rendered using the CheckoutViewModel class (including any mixins or extenders for customization) and the sb-checkout handlebars template in your active StoreBuilder theme.
The /checkout endpoint will accept POST requests either as a traditional form post (request header Content-Type is either application/x-www-form-urlencoded or multipart/form-data) or as an AJAX POST request with a JSON encoded payload.
If the Accept header for any request made to /checkout contains the string application/json then the server will respond with a JSON serialized payload of the CheckoutViewModel. Otherwise the server will respond with the rendered output from the sb-checkout handlebars template provided with the instance of CheckoutViewModel. This allows for both traditional post-back oriented forms as well as modern AJAX enabled forms.